FYI: THE CONTENT SHOWN ON THIS PAGE IS FROM THE 2019-2020 SCHOOL YEAR.
IT DOES NOT PERTAIN TO THE 2020-2021 SCHOOL YEAR AT THIS TIME OF REMOTE LEARNING.
THANK-YOU!
MS. DETWILER : )
Capturing Nature in Art
Last week I talked about the topic of Landscape Painting and shared with you several resources on the process of setting up a landscape drawing or painting. Like many of our drawing exercises, the landscape uses the same core foundations of drawing and painting that we use in all art processes in order to build a 3-dimensional image on a 2-dimensional surface- these include: foreground, middle-ground, background, overlapping, proportion, placement, perspective, the rule of thirds, and a full range of value.
This week, I have pulled together several resources for you to look at with regard to famous landscape artists and their most notable works and even creative styles.
10 Most Famous Landscape Artists and Their Masterpieces
Famous Landscape and Nature Paintings
Contemporary Landscape Painting - My Modern Met
Landscape Artists in Modern and Contemporary Art - ARTLAND
In addition, I also wanted to share with you a Pinterest Page that I put together that is a collection of Landscape Art called Horizons.
I also have collected some artworks & illustrations which hone in on nature’s beauty in much closer detail, I call this page Beautiful Biology. I’ve collected several different nature resources in my “Word is Art” Pinterest pages that you may wish to check out for references and inspiration.
I think that you may also like Trees, or even the one I’ve titled Insects are Aliens which shows the amazing color combinations to be found in some of the smallest creatures.
If you see something you like in these images then do some practice sketches. Use pencil, colored pencil, crayon, pastel, pen and ink, marker or paint. There is no end to the possibilities of artworks you can make based upon nature.
Have fun and use your imaginations!
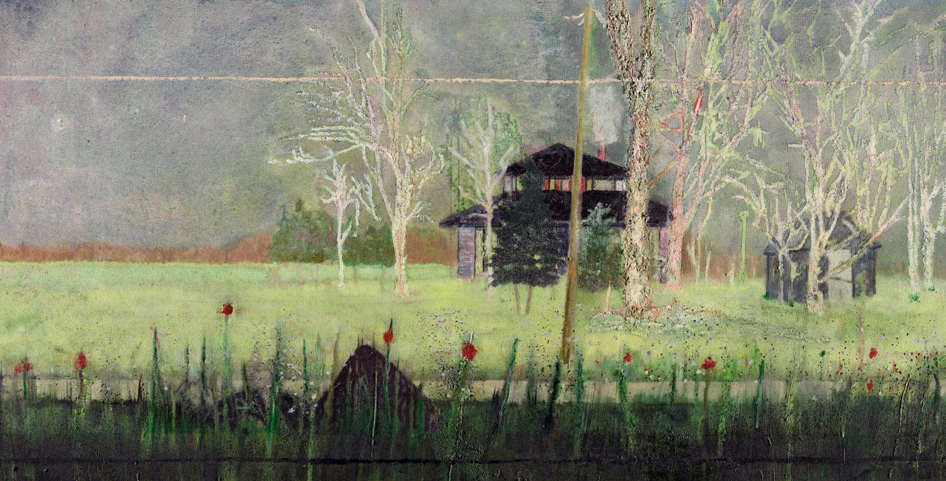

Go Outside and Draw a Landscape!
For this week’s enrichment lesson, I would like to like to direct your attention to the subject of landscapes. I thought that since we have completed our Grade Improvement Modules, I would present a new focus!
Landscape Drawing is a very popular subject or genre of drawing and painting. In fact, some artists actually specialize in Landscape Art which is referred to as Plein Air.
As the weather is turning warmer and the desert flowers are blooming, our landscapes are ablaze with new life and color! And, with the current slower-pace of life (due to the closures of many of our entertainment venues), it is the perfect time to get outside and make some art - whether you decide to draw the plants in your yard, or walk down to the river, or even up on the mountain, you will not need to go far to find dynamic subject matter. You can even take some photos with your camera if you like and then come home and draw from your references. Or, you can just sit in the quiet of the outdoors and draw on-site. Most importantly, take time to soak in the solitude while observing nature, and practicing setting up your landscape drawing.
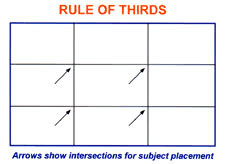
NOTE: landscape drawings will be successful if you include foreground, middle ground, and background - with overlapping. You also need to remember to use placement, proportion, perspective, and perhaps even a bit of atmospheric perspective. Try using “plumming” techniques to measure the size and distance of the landscape in your drawing, and remember that the Rule of Thirds can help you to compose your picture into an interesting scene that allows your eye to travel throughout the picture plane.
Here are some links to instruct you:
https://mymodernmet.com/landscape-drawing/
https://www.youtube.com/watch?v=oh9EeP5RjtM
https://www.artistsnetwork.com/art-subjects/plein-air/plein-air-art/
https://www.arttutor.com/blog/201909/6-tips-sketching-en-plein-air
https://drawpaintacademy.com/7-plein-air-painting-tips/
https://www.youtube.com/watch?v=omRC3CBe3_w
.jpg)
Landscape Drawing photo from the My Modern Met Article- Follow these 4 Easy Steps to Sketch Any Landscape You See.

Week 7 - Beginning Art Enrichment Lesson
Still-Life Drawing
Dear Beginning Art Students
I have been looking at famous Still-Life Drawings and paintings this week and have included some links here for your weekly enrichment lesson. I thought this would be fitting since our Beginning Art "Grade Improvement Module 2" is on the topic of Still-Life.
I hope that the list below might be an inspiration for you for your own drawings (whether you may be drawing for extra-credit/enrichment points or for the Grade Improvement Module 2 which is due next week on May 4th by 7am.
Famous Still-Life Drawings and Paintings:
- The Most Famous Still-life Artists and Still Life Paintings - https://www.superprof.us/blog/still-life-artists/
- Conservapedia “Famous Still-Life Paintings” -
https://www.conservapedia.com/Famous_Still_Life_Paintings
- Ten Most Famous Still-Life paintings by Renowned Artists - https://learnodo-newtonic.com/famous-still-life-paintings
- Symbolism in Still-Life Painting - http://www.bbc.com/culture/story/20180318-secret-symbols-in-still-life-painting
Links to a few of my favorite Artists who painted Still-Lifes:
GRADE IMPROVEMENT MODULES:
Dear Student,
I am including the direct link to my Beginning Art Grade Improvement Modules here for your convenience.
Please use them if you are interested in raising a current "PASSING" grade or bringing a current "FAILING" grade up to a passing level.
Note: Please contact me via email at bdetwiler@muhs.com if you need further information. You may call me directly at #928-254-9932 on my cell phone, if you would like to discuss your grade options in detail.
Take care and stay well!
Ms. Detwiler :)

Week 6 - Beginning Art Enrichment Lesson
The Purpose of Portraits:
At the beginning of our Portrait Unit, we watched a film by the Annenberg Learner about the function of portraiture, and its relevance throughout history. The specific message of this film was to describe different types of portraits, and also how portraits can be a great communication tool to educate, inspire and even manipulate the viewer.
This week, re-watch the film we viewed in class (https://www.learner.org/series/art-through-time-a-global-view/portraits/) and then pick one of the topics of cultural portrait references (listed below) and click thru the added sitesfor further research
If you feel inspired, then attempt to do a portrait in one of the styles. Try emulating the specific & distinct concepts and practices emphasized.
Below is a reference list of some of the cultural topics we looked at in the film. I have provided extended online resources that you can investigate, and you can go even further into these subjects on your own if you like.
Artist vs. Subject: These types of portraits are very much about who is in control of how the person in the portrait is portrayed? Sometimes it is the Artist and sometimes it is the Patron.
- Picasso paints Gertrude Stein example -
- http://www.visual-arts-cork.com/paintings-analysis/gertrude-stein-picasso.htm -Gertrude Stein liked her portrait. To those who protested at her mask-like features, Picasso replied, "everybody thinks that she is not at all like her portrait but never mind, in the end she will manage to look just like it". And apparently she did. Stein kept the portrait with her throughout her life, and it was the only painting from her extensive collection which she bequeathed to a museum, and quite specifically to the Metropolitan Museum of Art
- https://www.khanacademy.org/humanities/art-1010/cubism-early-abstraction/cubism/a/picasso-portrait-of-gertrude-stein
- https://www.pablopicasso.org/portrait-of-gertrude-stein.jsp
Commemorative Portraits:
- The Priest Kuya-Shonin by“Kosho” (Japan, active late 12th–early 13th century)
- Terra Cotta Heads of Ghana
- https://www.google.com/search?rlz=1C1AFAA_enUS465US502&sxsrf=ALeKk01-L8CeyayhaQtvlzAgefGcQ4SGFw:1587512315557&q=Terra+cotta+heads+commemorative+Ghana&tbm=isch&source=univ&sa=X&ved=2ahUKEwiQpZSd2ProAhVDjK0KHZW-B-4QsAR6BAgKEAE&biw=1920&bih=920
- https://www.metmuseum.org/art/collection/search/311024
- https://www.khanacademy.org/humanities/art-africa/west-africa/ghana/a/memorial-head-akan-peoples
Power Portraits:
- Moche - Ancient Pottery “Ruler” Portrait Vessels:
- https://www.khanacademy.org/humanities/art-americas/south-america-early/moche-culture/a/moche-culture-an-introduction
- https://traveltoeat.com/moche-culture-portrait-vessels-1-800-ce-larco-museum-peru/
- http://www.artnet.com/artists/kehinde-wiley/
- https://www.metmuseum.org/art/collection/search/308527
- https://www.artic.edu/artworks/91620/portrait-vessel-of-a-ruler
- Kehinde Wiley (Contemporary Artist, currently living) - Constructing a Narrative of Power
In closing, reflect upon the images you have seen and consider making some planning sketches for a drawing activity related to your research.
Send me any work that you have produced for Extra Credit Points.

Beginning Art Enrichment Lesson
Greetings Beginning Art Students-
I have been looking at a lot of art online during the school closure and it has been very inspiring!
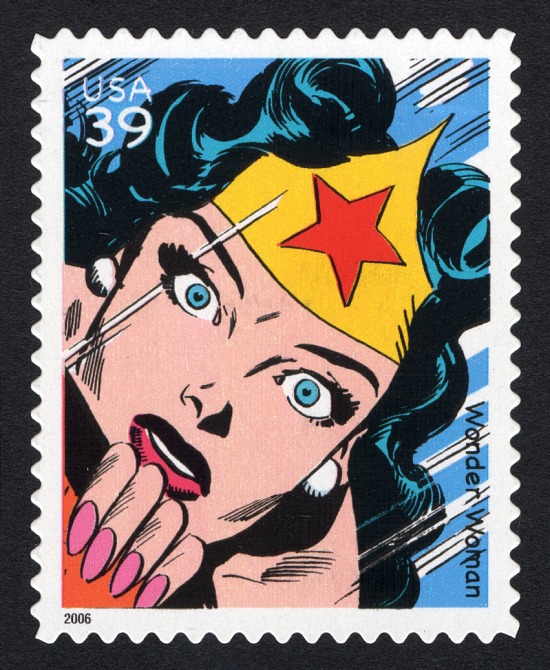
For this week’s enrichment, and in keeping with our Portrait Unit theme, I encourage you to look at the Smithsonian Institute which is located in Washington D.C. It offers so many interesting links and educational topics to inspire learning. Then you should look at the Smithsonian’s National Portrait Gallery and look over the amazing offerings in their collection. This is a good enrichment resource to add to your current studies on Portraiture Drawing. Each of the portraits in this website was created by someone who was once where you are in your learning!
Then you may want to check out the Current Exhibits page or the Visit at Home page, which offer extensive links to ongoing and current art displays and articles that might just be on here for a limited time. If you like Super Hero artwork, then you may want to visit this exhibit link titled - Excelsior! Super Superhero’s. The artwork offered on this page includes portraits that are in cartoon-style.
I hope that you enjoy this material.
Take care, keep learning, and stay safe!
Ms. Detwiler ??
NOTE: All learning topics are hyper -linked above. However, for your convenience, I have included the web addresses here as well in case you may need to cut and paste them to your browser:
- Smithsonian Institute -https://www.si.edu/
- National Portrait Gallery - https://npg.si.edu/visit
- Current Exhibits -https://npg.si.edu/whats-on/current-exhibitions
- Visit at Home - https://npg.si.edu/visit
- Super Hero Art - https://www.si.edu/spotlight/superheroes

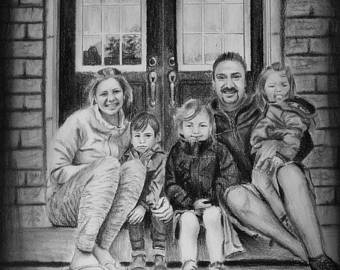
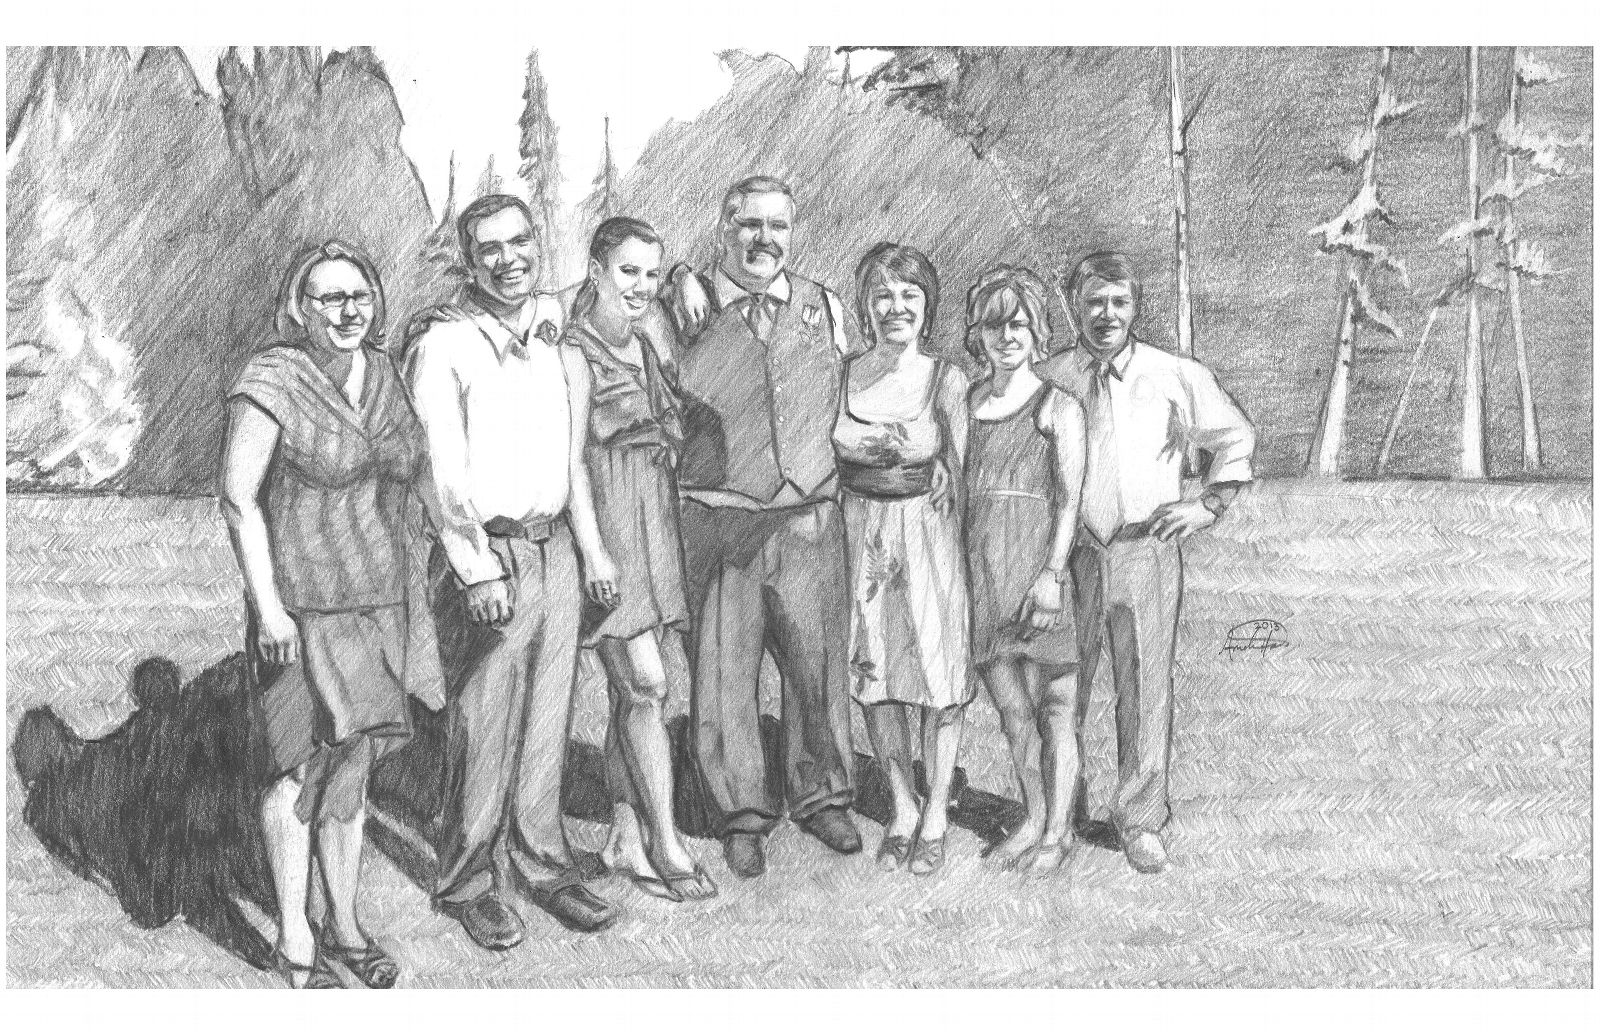
Draw a Portrait of Your Family or Draw a Portrait of Your Favorite Hero
This week, I would like for you to explore drawing a portrait of the people that are most important in your life. As we have been quarantined together in our family units, it is a memorable time to document this historic moment through your artwork.
For some of you, you may find that you are spending more time alone than with others. As an alternative approach, you may choose a drawing subject who is a hero, or someone you admire, or aspire to be like. This could be a family member, or, it could even be your favorite super hero.
Step 1- Find your Reference
Take a photo of your family in a familiar setting, or find a family photo taken when you were on vacation, or during a memorable family event. If you choose to draw a super hero, find a good quality photo on the web, in a comic book, poster, etc. which you can use as a reference.
Step 2 - Study your Reference Photo
Make the decision whether you will draw your portrait Free-Hand method or whether you will use the Grid Method that was shared in our Week 3- Beginning Art Assignment. If your photo is a copy and can be drawn on, I suggest you try gridding. But if your reference is valuable such as a unique family photo, poster, or book illustration that cannot be photocopied, then you should not grid on top of it and may want to go with a Free-handing it.
Step 3- Start with a Light Sketch
If freehand drawing, you will need to study your composition of your image and make a very light, well-proportioned initial sketch onto your paper. Make sure that you fill the entire page with your complete composition lightly before you start shading and adding darker value. Remember, the reason we start with light “whisper lines” is so that you are able to erase them easily if you need to make adjustments on size, scale & proportion, placement, and perspective.
If gridding, you can make the grid onto your photo with darker lines, but then you will want to make very light grid lines onto the picture plane of blank paper that you will be making your drawing on.
Step 4- Have fun with this and try to capture the personality of your relatives.
Think about who the people in your portrait are. Think about their unique personalities, clothing and facial expressions. Also remember to include the foreground, middle ground, and background in your picture. Think about the proportions, and the placement of the objects in the scene and the perspective of the room and the furniture that may be in the scene. Also think about how things and people may overlap one another. And lastly, remember to give it a full range of value for sharp contrast in your finishing phases, using circular shading.
Here are some links to Family portrait ideas:
https://www.youtube.com/watch?v=FpR_syz3f1Q
https://www.youtube.com/watch?v=DY9xpNJf5ck
https://www.youtube.com/watch?v=L1w6MGUuXvM
https://www.youtube.com/watch?v=1P7ZF_bpLSk
http://bethdetwiler.myteachersite.org/teacher/site/index.cfm?page=21775 -check the assignment posting on my Teacher website for more examples of family portrait drawings.
This is my family portrait painting that I did many years ago, just out of high school. It is of a family gathering when I was young. I am actually a 4 year old child in this photo - I have pig tails and a black top with a red collar. I used a Polaroid photo from 1966 as my reference. This painting is quite large compared to the photo. It is about 3.5 ft. x 4 ft. and the photo was about 3“x 3”. It is free-handed, not gridded but the proportions are pretty accurate to the photo. My medium was oil paint on canvas, but I started with an underlying charcoal drawing on the canvas before I began painting.

Other Family Portraits from Google:


Grid Drawing Process & Drawing Exercise
Dear Beginning Art Students,
If we were in classes right now we would be learning about the process of Grid Drawing which is basically a measured drawing technique which allows you to transfer an image from one picture plane to another. In this process you can make your drawing the exact same size as your original photo image (also known as a transfer drawing), or you can choose to increase the size of the image (also known as an enlargement) which can be done by mulitplying the size of grid on your picture plane.
I am posting several YouTube tutorials here for you to observe the process and then I will detail an actual project for you to try.
How to set up a Grid Drawing:
-
Overview How to use the Grid Method with an Example of image of Artist, Chuck Close:
https://www.youtube.com/watch?v=Gsmjdx0ArVk
-
How to Grid and Enlarge a Photo Reference for Drawing:
Part 1: https://www.youtube.com/watch?v=dDYk8qjG1B0
Part 2: https://www.youtube.com/watch?v=klOKZrpnSoQ
-
A Visual Tutorial and Study of how to Enlarge an image by gridding- https://design.tutsplus.com/tutorials/how-to-use-a-grid-to-enlarge-an-image-while-drawing--cms-20593
Try this process at Home after watching the video tutorials shown above:
For this Art Lesson, you will need to print a photo from your computer, or find a photo out of a magazine or newspaper.
Step 1 - take a ruler and carefully measure your photo into 1 inch or ½ inch sections, equally on all sides of the photo. Use tic marks to mark your measurements.
Step 2 -using your ruler and a pencil, now connect all your tic marks with lines to create a symmetrical grid structure on your photo.
Step 3 - now take a blank piece of copy paper or use a page in your sketchbook and measure out a picture plane that is the exact same size as the photo you just gridded. Measure your blank paper into the same sized grid that you did on your photo, whether 1 inch or ½ inch grid. NOTE: make sure that you use very light lines for the grid on your blank paper because you will need to erase them eventually , and if you make them too dark they will show through and compromise the integrity of your drawing.
Step 4 - Label your gridded photo and your blank gridded page with A,B,C’s and 1,2,3’s etc. as you saw in the video tutorials. This labeling will help you put the correct part of your image into the correct place on the picture plane of drawing so that you can achieve the utmost accuracy.
Step 5 - begin sketching the outer contours of your drawing lightly at first to make sure you have the general outline of information in the right squares on your paper. Once your contour is in, you can begin adding shading and line to detail your image. Make sure to add a full range of value to your drawing. Have Fun and Good Luck with this process!
A Sample Image of a Transfer Grid
.jpg)
A Sample Image of an Enlargement Grid
Contemporary Portrait Artist who Grids:
Chuck Close - is a world-famous artist, with disabilities, who uses the grid method in his artwork -in a big way! Here is more information about him and his work:
YouTube Videos featuring Chuck Close:
-
CBS This Morning - Artist Chuck Close writes note to younger self-https://www.youtube.com/watch?v=milXH-433vs
-
Chuck, Up Close - https://www.youtube.com/watch?v=_OWy2AWGSDI
-
The Face-Blind Artist -https://www.youtube.com/watch?v=cGSA9RMSrQQ

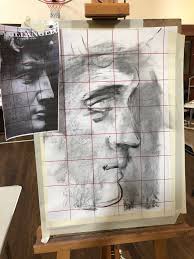
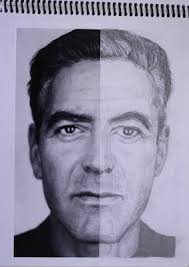
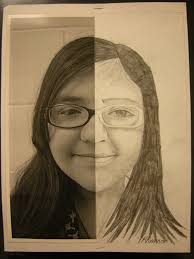
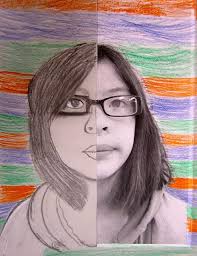
HALF- FACE SYMMETRICAL PORTRAIT DRAWING ASSIGNMENT
Dear Beginning Art Students,
If we were in class right now, you would be working on a project that we call “The Half-Portrait Symmetrical Drawing.” This is where we take a photograph that shows a frontal pose of a human face (one that is very symmetrical), then cut it in half, paste one of the halves down onto a sketchpad or piece of copy paper and then draw the missing half (which was cut away) as accurately as possible with our graphite art pencil or an HB yellow #2 pencil.
Please follow the steps detailed here below to work on this assignment at home:
- Select a celebrity portrait photo of your choosing from this link: https://www.sarahhasted.com/artists/martin-schoeller/slideshow/16/close-up/17 and then print a black & white copy of it
- Make it a full page - approximately 8.5” x 11” to fill a full sheet of paper.
- Then cut your photograph in half from top to bottom. The best way to do this with accurate measurement is to fold it in half from top to bottom and crease, then cut the creased line.
- Next, glue it into your sketchbook or onto another sheet of copy paper. Use rubber cement if you have it, or a glue stick also works well. If you don’t have either of those products, you can tape the top and the bottom edge of the photo to drawing paper.
- Make sure you place your half-portrait to the right or left edge of your paper and adhere it so that you have covered exactly half of the paper you will be drawing on. This will leave the other side of your paper blank for you to do the opposite side drawing with pencil.
- Take your time and try to match up the scale, proportion and detail of each feature.
- Also give your attention to the value of the skin and features, as well as the texture of the hair and even clothing.
- I have posted pictures here below to show give visual reference to the process.
- Here is a link to a famous Portrait exhibit where the artist used the 2 symmetrical sides of each of his models faces to create 2 unique individual portraits that look like 2 separate people. Take a look. This is actually very similar to your process of drawing the identical half of a face in your Half-Face Drawing Assignment. Click here: https://petapixel.com/2012/10/02/a-portrait-project-showing-subjects-with-two-perfectly-symmetrical-faces/
- Good luck and have fun with this!
Here is how you will set up your page:
Select and print out your photo reference
.jpg)
Then fold it in half as evenly as possible and then cut along the crease to get a symmetrically even half-face portrait.

Then use your glue stick, rubber cement or tape to adhere it into your sketchbook or onto another full piece of copy paper and begin drawing the missing half of the face, based upon what is shown in the photo half which you have glued down.
Student Sample Drawings using the Half Face Portrait Drawing Method:

If you would like, take a photo of your work and send it to my email at bdetwiler@muhs.com. I will post some of them on my teacher website gallery. And if you are feeling especially proud of your drawings and progress then upload your work onto our MUHS Art Facebook page at https://www.facebook.com/MUHS-Art-262405480487011/.
Good Luck and have fun!
Ms. Detwiler
______________________________
NOTE TO STUDENTS:
This assignment posting is not manditory, but it is designed to keep you up to date on what we would be doing if we were in class. If you are able to print a photo at home, give it a try. If you do not have a printer or ink to make a photo, then you could also draw a magazine portrait photo, photos of family members, or try looking in the mirror to draw you own self-portrait. Find a photo of your favorite celebrities on the internet and try to draw their portraits.
There are many options and possibilities! There are no wrong answers, you will gain expertise from practice, and extra credit points for focused work! Also, check all Art files that can be found in my teacher "Detwiler - Learning Resource Folder" which is posted (along with all other Teachers' Resource Learning Folders) on the MUHS website. Look into the files titled Art Resources and Activities for drawing activities and tutorial, as well as cultural online museum tours. Also look at Week 1 & Week 2 folders in the Beginning Art Folder for added portrait drawing resources.
Thanks and Keep Drawing!
Portrait Drawing - Practice, Practice, Practice!!!
Greetings Students,
As you are aware, we are practicing social distancing due to the Covid 19 situation. But, this does not mean that our Portrait Unit Learning has to stall. Portraiture Drawing takes a great deal of practice so I want to encourage you to keep sketching and practicing your facial features and proportions so that when we return to classes, you are ready to hit the ground running with regard to projects on the horizon which will include:
-self portrait drawings
-hero drawings
-gridded and enlarged drawings
Ideas for Self-Portrait Drawing Practice during "Week One" of the School Shut-down:
- Sit down in front of a mirror and practice drawing your own portrait. Think about your unique features and implement them using the facial proportion concepts we studied the week before break.
- Try to see how accurate you can be and also work with gradient value and flat value shading to give your drawing depth and dimension, and contrast.
- Revisit the Youtube facial features tutorials posted in the previous lesson to remind yourself how to draw and shade your - eyes, ears, noses and mouths and apply this knowledge to your own features.
- Also, try drawing a family member or friend that you are currently spending this closure break with. The more you practice and observe, the better you will get at judging proportions for accuracy.
NOTE: If you do not have your paper copy of the "facial features" packet with you at home, you can find it listed as an "Assignment File" linked at the bottom of the previous assignment Introduction to Portrait Drawing which is the post below this one here on my page.
Work on additional drawings and bring them in when we return to classes for a boost in extra credit.
Extra Credit Points will also be given for well executed drawings which you have done during the Shutdown.
- Stay safe and well!
- Be kind to others!
- Wash your hands!
Note: You may now access my Learning Resource Folder for Art enrichment links and drawing ideas. This can be found on the Mingus Union High School website offering folder entries for all your teachers.
See you in a couple of weeks!
Ms. Detwiler ![]()

We will begin this unit in portraiture by learning about the relevance and impact that images of the human face have garnered through out history, from ancient societies up to our modern day artisans. Classes will view a facinating educational video (and complete a graphic organizer questionairre) on the topic of the portrait offered by the Annenburg Foundation (2017). Video content description:
"Throughout history and across cultures, people have shown a facination with faces, and in turn, with portrait representation. The depiction of an individual likeness is about indentification, but more than that, it is a record of an interaction between an artist and a sitter, both of whom contribute to the portrait's form and content. Far from being mirror reflections, portraits are complex constructions of identity that serve a range of functions from expressing power and declaring status to making larger statements about society at a given point in history."
Week One of Portraiture Unit:
- Day One: Student will view portrait video and discuss observations they have made regarding the importance of the portrait.
- Day Two: Students will group up in pairs to do a drawing exercise with a classmate to set a "benchmark" that will provide documentation of their initial skills as they begin their training in portraiture. Students will then recieve and work from an informational packets of diagrams and drawings to assist them in learning the structural elements of the face and head. They will begin by drawing the frontal view of the head which entails locating standard proportions regarding the stucture and location of all facial features.
- Day Three - Five: Students will learn to draw the individual facial features, such as: eyes, ears, noses and mouths.
Students will work on practicing the proportional measurements of the Frontal Face, and then do 5 repetitions of each facial feature for the week. Drawings will begin on Tuesday March 3rd. They are due for check-in as a sketchbook assignment on Monday, March 16 (after the Spring Break) and they are worth 100 points (25 points per feature, in all four catagories).
Here are a few selected Youtube Video Tutorials which students may reference to assist them in their practice drawings:
- Face: https://www.youtube.com/watch?v=SYjpkg6vrlg&t=2114s
- Face:https://www.youtube.com/watch?
v=pE2-CGTtQzc - Eye: https://www.youtube.com/watch?v=UL6QxeVlRrQ
- Mouth: https://www.youtube.com/watch?v=lXv9KzLEZtE&t=18s
- Nose: https://www.youtube.com/watch?v=7ueWr2EseM0
- Ear: https://www.youtube.com/watch?v=R8GWsL5KEW0&t=28s
- Ear: https://www.youtube.com/watch?v=PwEKoFSjSGU
- Ear: https://www.youtube.com/watch?v=FA7aeZNVVeI
- Ear: https://www.youtube.com/watch?v=H0MNN5wCQ_k
Click on Assignment file here below to access Portrait Packet used in class to practice individual facial Features and facial proportions.

Written Critique of Artworks by Artist, Janet Fish
Students will work on an AZ Merit Practice Essay this week which focuses on learning how to evaluate artworks in a formal manner.
They will learn about the process of formal critique, using the four step process model (describe, analyze, interpret, evaluate/judge) of critical analysis to evaluate their selected painting sample by well known oil painter, Janet Fish.
- Essays must be typed and written in MLA format.
- Essays must be 5 paragraphs, with a minimum 5 sentences per paragraph
- Essays are due at the end of class on Friday, Feb. 21st. Students may email their essays to Ms. Detwiler (bdetwiler@muhs.com) or share essays from their Google Docs thru Feb. 24th for full credit. Essays will be accepted after Feb. 24th, but with a loss of 5 points per each day they are late.
- Small sample color copies of paintings used in the critique process must be stapled to the essay when submitting for grading or digital files must be imported from the internet and placed at the end of the essay if students are submitting and sharing Google Docs or Microsoft Word 365 Documents via email.
This assignment is worth 100 points.

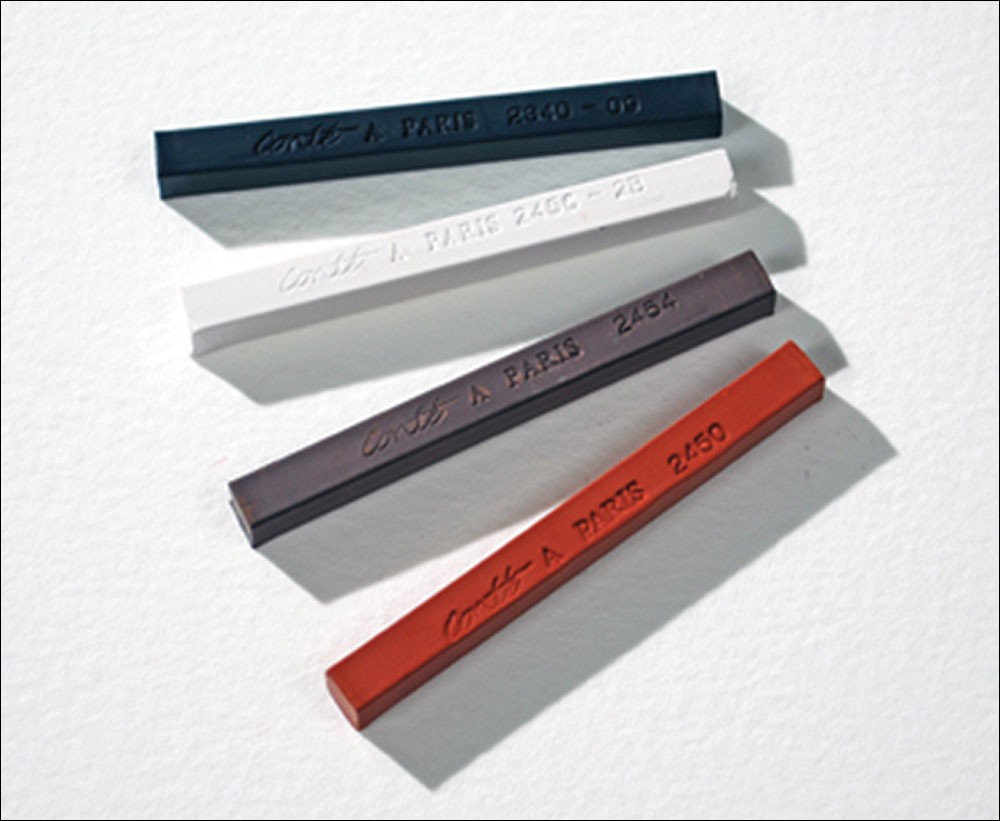
In this Skull and Saddle Still Life drawing lesson, students will be using all the concepts and Elements of Art that they have learned thus far in their Beginning Art Classes. They will refer to their prior knowledge of Placement, Proportion, Perspective, Overlapping, Full Range of Value, Local Value, Light Source relating to Shadows and Highlights, Smudging and Shading, and Negative Space.
In addition, they will be introduced to a new artist's medium called Conte, which is a bit similar to charcoal. They will be using a classical pallet of black, white, brown and terra cotta, with added brightly colored conte sticks of green, red, blue and yellow for accent.
Students will also learn the about the "Rule of Thirds", an artists & photographers' technique of composing subject matter on the picture plane by dividing the surface into a grid pattern which helps to place the objects for a dynamic and balanced presentation.
This assignment is an important drawing exercise which synthesizes all of tools and techniques which students learned in the previous charcoal drawing exercises. It will also be used as the focal point for for each student in an upcoming Art Aesthetics unit assignment which showcases individual students' artwork in a Formal Art Critique presentation and analysis, given in a group setting.
- The Skull & Saddle Still Life Drawing is worth a total of 300 potential points.
- 2 Quick planning sketches are worth an additional 50 points each.
- There will also be a 50% Check-in for 50 points on February 13th.
- The Due date for the Drawing has been extended to Friday, February 21st. Formal Class Critiques will begin on Monday, Feb. 24th. During Critiques, students will present their drawings to the class and answer questions related to their process. Students will be expected to participate in classroom discussions during critique presentations. They will also fill out observation worksheets each day, detailing information observed in artworks and presentations they've observed.
Here is the link to the Skull and Saddle Still Life Google Slide Show presentation for this project which students viewed in class.
Conte Crayons

Charcoal Drawing Lessons:
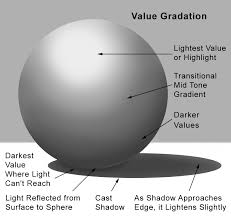
During the first few weeks of this new semester students will begin learning the basic techniques of drawing with charcoal. They will experiment with compressed charcoal, vine charcoal (aka-willow charcoal), and white chalk to create "light-based" value studies of familiar 3-D geometric objects such as spheres, cubes and cylinders.
The emphasis in using the charcoal medium will be to further students' understanding of value, developing visual sensitivity to shadow and highlights generated by the light source as it is reflected upon on geometric objects that already have local values of black, white and grey.
Local Value in drawing or painting refers to the essential value of an object's or figure's surface without the inclusion of any texture or lighting. Local value is the value of an object or figure without any shadow pattern.
Students will begin this unit by experimenting with the Charcoal Medium to become familiar with its properties and workability.
They will then move onto a small Still-life Study which will be composed of simple black, white and grey geometric objects to familiarize themselves with this new medium.
The Still-life Study will be their first official drawing using charcoal and will serve as their sketch book assignment. It will be sized at approx. 9" x 12".
Once the study is completed, students will then move on to a larger "Drapery Still-Life" charcoal drawing which is 12"x 18" in dimension. Drapery is a classical subject in still life drawing due to it's nuanced value, dimension, and hard and soft edges. It does take attention to detail as well as concentration to master. Watch this Charcoal Drappery Video Tutorial to get a sense of the process. Drapery Still-lifes will also include some familiar geometric objects for enhanced composition.
Students will watch in-class demonstrations & Youtube tutorials which reveal a variety of techniques associated with the concepts of local value, and the "dramatic effects of lighting in art" also known as "chiaroscuro."
They will also learn about different charcoal drawing techniques such as smudging and medium subtraction which will allow them to create subltly defined local value regarding "core shadows, cast shadows and highlights" of the objects in their individual drawings.
Students will also continue to apply drawing concepts learned in previous units, including: placement, proportion, perspective, overlapping, plumming, and full range of value.
Charcoal Drawing Assignments:
- Intro to Charcoal Medium with Geometric Shape Warmups- 1/6/20 - 1/8/20 - 50 points.
- Local Value Still-Life - 50 point. Due on 1-14-20. 100 points
- Large Drapery Still Life - 100 points with a projected due date of 1-27-20.
.JPG)

Beginning Art students will be creating and constructing a Tunnel Book for their Midterm Assignment.
Tunnel Books are made up of a series of pages that are held together by stips of paper on each side. In fact, the sides of a Tunnel Book might make you think of an accordion. The overall effect of a Tunnel Book is to create the illusion of depth, space and perspective.
Process:
-
The Tunnel Books will be constructed of Bristol Board which is a thick & rigid artist grade card stock. The books will be 6" x 6" square and will consist of the 2 accordian-folded side pages and then 5 pages of illustrations - which are like layers, or slides which fit into the accordian structure with rubber cement.
-
Students must do a well designed planning sketch prior to getting their Bristol Board kits. This Sketch is worth 100 pointsand is due at the end of class on December 9th. The special Bristol Board paper suppliy is limited so their planning sketch is important as they will only recieve enough paper to problem solve their design.
-
Students will be using Xacto knives to cut out their design in their slides allowing their scenes to unfold from the front frame to the back. Students should make sure that the blades they are cutting with are sharp because it will lead to better cuts and cleaner edges which affects their grade concerning good use of materials.
-
Students may elect to use a variety of medium or mix their medium in this project. Medium is a work for various art supplies used in an artwork. For this project, students may elect to work in Black, White and Grey Scale with graphite pencils as we have done in many projects this semester. They may also use photos and magazine clippings as we did in the Photomontage project at the the beginning of the year. They may also use sharpie marker, colored ink or colored pencil.
Note: This project is designed to fun, creative and challenging with open-ended results - meaning that students are able to use their own ideas & subject matter for their artwork as long as themes are school appropriate and accurately show the Illusion of Space by implementing all foundational elements learned over the course of this 1st Semester, including: Foreground, Middleground, Background, Overlapping, Proportion, Placement, Perspective, Negative Space, Full Range of Value, and Neatness showing Good Use of Materials.
Grading Rubric:
Tunnel Book Midterm is a 1000 points assignment (which is equavalent to 10 regular projects).
-
SWBAT show the Illusion of Space with accurate use of Proportion, Perspective, Placement & Overlapping = 200 possible points.
-
SWBAT show the Illusion of Space with 1- Background page, 2- Middleground pages, 1-Forground page and a Front Frame in their Tunnel Book = 200 possible points.
-
SWBAT have cut out portions of their Foreground, Middlegrounds and possibly their Frames to create Negative and Positive Space within their projects = 200 possible points.
-
SWBAT will show a Full Range of Value in their projects creating Contrast, no matter what medium they use or whether they are using a Grey Scale or Color Scheme to produce their work = 200 points.
-
SWBAT show Neatness, Good Use of Materials for Craftsmanship in their work = 200 points.
Internet Website Resources to help you Visualize this assignment:
-
Click on the link here to watch our classroom Tunnel Book Powerpoint which shows many colorful examples and themes.
-
Watch this youtube video - https://www.instructables.com/id/How-to-make-a-Tunnel-Book
Students will take a 15 Question Multiple-Choice Exam that covers Art foundations and concepts covered over the course of the 1st Semester. This exam is worth 100 points.
Study Guide Attached in Link below.

The "Creative Spheres" Drawing assignment functions to provide a creative ending to our Geometric Still-Life Lesson.
In this drawing, students will be able to pair their drawing skills with their imagination in order to come up with a unique interpretation of a common shaded sphere by transforming it into an spherical illustration through creative reference and gradient value shading to provide a 3-Dimensional rendering that goes beyond the geometric shape itself.

This "Self Portrait" by M.C.Escher is a good example of a Creative Sphere
Here are the Assignment Objectives of what you will be learning and exhibiting in your artworks:
Objective 1: Students will create a drawing using a full range of values
Objective 2: Students will keep the light source consistent with the still life set up on their modified objects.
Objective 3: Students will use tools appropriately to create a work of art that has high craftsmanship- using circular shading and neatness in your finished products.
Students will spend a total of 5 days of classtime on this assignment. They will also be able to utilize Thanksgiving Holiday Break time to work on their drawings should they need to.
Assignment is due on Dec. 3rd at the beginning of class.
Total Value is a possible 100 points.
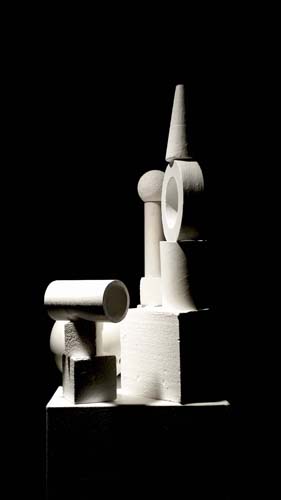
In this portion of the Value Unit, students will take all the skills which they have learned to date (illusion of space, overlapping, foreground, middle ground, background, placement, proportion, perspective, value scales, gradient value, flat value, negative space, and circular motion shading) and put them to use in the competency of drawing and shading 3-D Geometric Objects, arranged in still life groupings under dramatic lighting.
On Oct. 24th, Students will begin a series of small warm-up drawings of individual geometric shapes in their sketchbooks to gain understanding of the volume of these objects and how important light and shadow are to their perceived dimension. These sketchbook drawings will include rendering and shading spheres, cubes, cones and cylinders and they are essential to building the skills needed to succeed in the larger Geometric Still Life Drawing which follows.
Geometric Still Life Drawing - In this larger drawing, students will work with a more complex arrangement (see photo below) of the shapes they have practiced which will provide a thorough artistic assessment of all art concepts and skills covered thus far during their first semester of Beginning Art.
Completion and check-off of "in-class sketchbook drawings" is Monday, Nov. 4th and they are worth a total of 100 points. Students should complete them before engaging in the larger Geometric Still-Life Drawing which begins on Tuesday, Nov.5th.
There will be a midway 50% check-in on Thursday, Nov. 14th. Students that are working steadily and have completed at least 50% of their drawing will receive an additional 50 points. These points are only available on that day, however if a student is absent from class, they will be able to check-in their work upon return to class.
Large Geometric Still Life drawing is worth 200 points and must have a planning sketch prior to beginning on large paper. Assignment is due on Novem
Here is what students will be graded on:
- Neatness and good use of materials including circular shading technique and clean surface, free of excessive smudging.
- Proportion, Placement, Perspective in the structuring of space and dimension in their drawing. Proper Overlapping of objects.
- Full Range of Values and good solid sense of light source for highlights, core shadows and cast shadows.
- Using the Rule of Thirds to place Objects in the Picture Plane with interest and solid composition.
How to Shade an Object
Geometric Still Life
VIEW HELPFUL VIDEO TUTORIALS FOR DEMONSTRATIONS ON DRAWING & SHADING 3-D OBJECTS:
- https://www.youtube.com/watch?v=gE1CmIzQzgE
- https://www.youtube.com/watch?v=maejnk9tF5Y
- https://www.youtube.com/watch?v=vMr6eimcolc

Students will exchange their completed Abstract Drawings with other classmates at the beginning of class on Monday, 10-21. They will then spend the entire class period working on a writing assignment to give their observations and oppinions (also known as an informal critique) based upon the rubric given for this assignment.
In their writings they will use complete sentences to form a 3-paragraph/one-page analysis of the artwork of another classmate based upon the lesson's rubric guidelines as covered in class.
In this exercise, students will use a 3-paragraph short essay writing format to discuss/critique an Abstract Artwork, firsthand, by covering the following content:
Introduction: Tell us what type of drawing you are going to be critiquing with regard to - the medium used, and what style/type of artwork it is. Use Vocabulary words such as: Abstract, Nonrepresentational, Nonobjective, and others found on your project vocabulary list given on the first day of the lesson.
Body: In the main body of the writing assignment, discuss the rubric of guidelines that were given for this assignment, including:
- Is the piece a sucessful Abstract Artwork? Is it nonrepresentational or nonobjective? Why or why not?
- Does the piece show full range of value and contrast? Why?
- Does the piece show a good amount of texture or pattern? Does it include Flat Value and Gradient Value shapes?
- Does it show good use of material? Why or why not? (ie. Is it neatly crafted? Did the artist use circular shading techniques? Are there overlapping shapes to display depth such as a sense of foreground, middle ground and back ground even the artwork is abstract.
Conclusion: In the concluding paragraph discuss your thoughts and feelings about the work. Does it seem finished? Do you think it has balance and unity, meaning-did the artist think about the whole page and work to fill in the spaces in a way that makes your eye want to visit all parts of the piece? Does the craftsmanship seem like the person worked hard to create a good artwork or does it look rushed and hurried as if they did not spend enough time developing the piece as they might have?
After completing the writing, give your thoughts on what grade the drawing might deserve in your oppinion based upon the rubric as follows:
- Possible 33 points - for showing a Full Range of Value
- Possible 33 points - for showing 8 Patterns/Textures, Flat Value and Gradient Value
- Possible 33 points - for having neatness, circular shading, and being completed and unified in design.
NOTE: This writing assignment is worth a total of 100 points. Students will work on it only one day during class-time; after that it will be homework because we will begin a new project on Tuesday. Please complete your Abstract Art writing assignment and turn it in no later than Thursday, Oct. 24th for class grade posting. Thank you!
In this lesson, students will be learning about the Abstract Art Movement of the 20th Century. They will learn about the cultural phenomenon of Abstract Art and the role that it plays in Art History. Students will view a presentation on the assignment topic with a short Youtube video on Abstract Art.
Students will create an Abstract Drawing that is non-representational in nature by creating a composition which incorporates a series of: lines, shapes, patterns and textures as the main subject matter. This drawing will have a full range of values to create depth and dimension, allowing them to put into use the skills which they have developed during the Value Scale Exercise of the previous week.
Objectives:
- Students will create a drawing that is abstract and non-representational in nature, using a series of shapes, patterns, textures and lines as its main subject.
- Students will create a drawing that has a full range of values.
- Students will show good mastery of materials demonstrated thru neatness in shading and control of graphite medium.
Assignment Guidelines and Dates:
- This Abstract Art Drawing assignment will be done on the Classroom Drawing Paper. Students will have a choice of 2 different rectangular sized sheets for their compositions.
- This Drawing is worth up to 100 points and is due on Oct. 23rd.
- There will be a 50% Check-in for a possible 50 points on October 16th.
- A Graphic Organizer handout for this Assignment is attached here below.

Shading Value Scales Lesson – 4 Scales
This week, Beginning Art Students will be starting a unit on "Value" in Art.
Value is one of the 7 Elements of Art (see attached vocabulary list) and is key in building volume, depth and dimension in drawing and painting, and other forms of 2-D Art.
Skills learned in the Value Unit will be an integral foundation to all projects in Beginning Art -all the way to the end of the year.
Value is the lightness or darkness of tones or colors. White is the lightest value and Black is the darkest value. The value halfway between these extremes is called Middle Gray.
Value Scales Assignment:
- Students will shade 4 Different Value Scales, either drawn in sketchbooks, or shaded on the "Value Template" handout provided in class.(The size format for the scales is 1.5" x 7" if creating your own template in your sketchbooks.)
- Students will complete 1-Flat Scale and 3-Gradient Scales in various configurations. Students should attempt to move flawlessly from black to white in step-by-step tones for these scales. One of the main objectives of the assignment is to achieve middle gray in each center square or area.
- Students will use a variety of different pencils (2h, HB, B, 2B, 4B, 6B, etc.) to neatly layer graphite for their value scales.
Note: Due to the nature of the softer lead pencils, students may want to use a small piece of paper or tissue under their hand while working so that the oils on their skin do not smudge their artwork.
- Students will spend approx.2 days of class time working on this assignment. After that it will be considered a homework assignment and will be due for check-in on Wednesday Oct. 3rd
- The total number of points upon completion is 60 points (equivalent to 15 points per scale).
Examples of balanced 7-Step Flat & Gradient Value Scales:
.jpg)
The Flat Scale (with each square a solid value) is on the top row.
The Gradient Scale (with gradual shading) is on the bottom row.

Now that students have learned about the illusion of building 3 dimensional space and perspective in their drawings, they will now beginning a series of lessons which focus on art foundations related to the creation of Value to enhance dimension and produce contrast within their drawings.
The first of these lessons on Value will introduce students to the concept of negative space.
In a negative space drawing, students will learn to train their eye to "see" the areas around the objects which they are drawing. This method will help them to then define the actual objects themselves more accurately because the negative space surrounds and defines the positive.
In the early part of the negative space drawing lesson, students will learn about the practices of contour line drawing and blind contour drawing. They will then take this knowledge and apply it to the exercise of making a negative space drawing of a simple "plant still-life" in their sketchbooks for .
Afterwards, additional items will be added to the plant still-lifes to add a hint of challenge and complexity in order to create a dynamic composition. Students will be encouraged to allow the still life objects to extend to the edges of 2- 3 sides of the picture plane within their planning sketches.
Once they have completed 2 thumbnails, they will then select the best composition and draw it onto a 12"x18" sheet of classroom drawing paper. They will use pencil for the initial sketch and then go over the lines in Sharpie marker and/or colored pencil to complete their and ehance the value and contrast in their drawings.
Note:
Sketchbook Grade - Students will need to bring sketchbooks to class in the initial planning phase of their negative space drawings. They will complete 2 thumbnail sketches as a homework grade, worth a total of 50 points (25 points each). The 2 Thumbnails are due for check-in on (or before) Monday, Sept. 23rd.
This still-life drawing is worth a possible 100 points.
Drawings will be due on Sept. 30th and will be evaluated for a 50% Check-in "Progress Grade" on Sept. 26th.

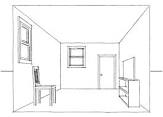
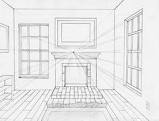
Students will be working on learning to draw a room in 1 point perspective. They will begin with a series of steps including:
Step 1- Create the Back Wall of your Room by creating a rectangle in the center of your picture plane.
Step 2 - Place your vanishing in the center of the Back Wall.
Step 3 - Use orthogonal lines to connect the vanishing points with the corners of the Back Wall and extend them outward using a ruler until you reach the end of the page. These lines will be your ceiling and floor lines.
Step 4- Now begin to place your Accessories and Details like furniture and doors and windows, rugs and curtains, etc. You must use the vanishing point and parallel lines that aline with the sides and top and bottom of the Back Wall.
Step 5 - Color your room with colored pencil or outline in thin black sharpie marker to complete the drawing for an additional 10 points extra credit.
This sketchbook assignment drawing is worth 50 Points and is due for Check-in on Friday, Sept. 20th.
NOTE:
Make sure you draw your room with light orthogonal lines to begin with so that they can be easily errased when finishing your drawing neatly. You can always go back and outline objects in darker value once you have erased all the excess converging lines that you made to create your objects.
Here are some images that illustrate the project. I will also include video clips to link into and watch the process on Youtube and follow along if you like.
Video Tutorials for help with 1 Point Perspective Room Drawing:
https://www.youtube.com/watch?v=XuqvIOuWAPU
https://www.youtube.com/watch?v=7ZYBWA-ifEs
https://www.youtube.com/watch?v=Ok58EFWIdDQ
In this assignment, students will continue to work in One-Point Perspective by doing an "on site" realistic drawing in the hallways of the 200 Building, just outside their classroom. They will use skills they have been honing in the previous Linear Perspective assignments.
Students will need to pay close attention to their physical position in the hallway when placing their vanishing point. It will not be in the center of the paper as it had been in the Room Drawing.
Students will be graded on the following:
- Understanding of One-Point Perspective and overall attention to the processes involved in one-point persective drawing such as accuracy of orthogonal lines, use of vanishing point and horizon line.
- Attention to detail regarding spacing, proportion, placement and perspective. Also details of bricks, doorways, corridors, exit signs, window frames, pillars, trash cans,carpet squares, ceiling tiles, light fixtures, wall posters, lockers, locks, baseboard molding and other architectural elements.
- Neatness and good use of materials- clean up all orthogonal line trails and any smudges, Try to press out any wrinkles and tape up any tears.
This assignment will be completed in sketchbooks or on classroom copy paper 8.5 x 11 inches in size.
It is worth up to 100 points and due Thursday, Sept 19th.

In this lesson, students will craft a creative word drawing using Linear Perspective and Lettering. Students will be asked to think of either-
- a unique adjective or noun to illustrate
- an interesting word that describes them personally
- or they may simply choose their own name
Once they have their word selected, they will do an initial planning sketch, in their sketchbooks, using the techniques of one-point-perspective that they have just learned through the "50 Boxes" exercise.
Students will want to pay attention to the following:
- the type of letters they are designing because different types of fonts will convey different moods.
- all lettering should be a form of "block letter" construction to maximize the effect of the illusion, but there are many ways to alter the stylings of the letters to enhance design.
- that once the letters are drawn onto the picture plane, students will begin to connect the corners to the vanishing point on the horizon line, using orthogonal receding lines.
- students will then decide where the back edges of their letters are, and add defining lines accordingly. All extra orthogonal lines should be erased now.
- students will now add additional details and images to their creative word picture to make it unique, balanced and complete. Other shapes may be added in one point perspective also.
- students will finish their art pieces by adding colored pencil, or black & colored sharpie marker to embellish and pattern.
Creative Word assignment is due on Tuesday, Sept. 3rd and is worth 100 points.
"50 Boxes" Sketchbook Assignment
Linear Perspective is a drawing method or technique which conveys 3-Dimensional depth on a 2-Dimensional surface. It shows how things appear to get smaller as they get farther away - converging toward a single, or multiple "vanishing point(s)" on a "horizon line." The concepts of Linear Perspective and its ability to depict the Illusions of space in Art, Architecture and Sculpture came to light in the Renaissance period in Italy and Northern Europe in the 1400-1600's.
50 Boxes Assignment: In their Sketchbooks, students will draw 50, geometric boxes using 1-point & 2 -Point Perspective. The purpose of this exercise is to familarize students with the practice of drawing using Linear Perspective techniques Geometric style boxes can be made with proper placement of a Horizon Line, a Vanishing Point or Points and Orthogonal Lines (also referred to as "converging lines" because they meet at the vanishing point).
Students will practice drawing (25) 1-point boxes and (25) 2-point boxes.This project is a homework assignments, however, 2 days of classroom time will be allotted for students to assist them in the process.
Boxes are due to be checked-in on 8-29-19 at the beginning of class. This assignment is worth a possible 50 points total- or 1 point per each box completed well. Neatness and Accuracy count!!! If boxes are poorly constructed or have been drawn without the proper use of a ruler (ie. with slanted or sloppy line quality), they will not be counted.
Youtube Video Links to assist you with drawing your Boxes at home:
1-Point Boxes:
- https://www.google.com/search?q=how+to+draw+1+point+perspective+box&rlz=1C1CAFA_enUS740US740&oq=how+to+draw+1+point+perspective+bo&aqs=chrome.1.69i57j0.12958j1j7&sourceid=chrome&ie=UTF-8#kpvalbx=_Rd9lXazKCI2_0PEPgLSGiAk23
- https://www.youtube.com/watch?v=bjhkxFDvD78
2 Point Boxes:
FYI - See the Beginning Art Gallery page on this Teacher website for additional photo images of 1 & 2 Point Perspective Boxes.

Students will begin learning about the importance of Perspective Drawing in Art to create the illusion of 3-dimensional space on a 2-dimensional surface. They will begin the unit by watching an Art History Documentary created by the National Gallery of Art in Washington, D.C., entitled Master's of Illusion.
In this film, students will be introduced to the historical period of art known as the Renaissance which is the time when perspective drawing emerged and flourished amongst artists in Europe during the 1400-1600.
Student will complete a worksheet in class while viewing the film which highlights important facts regarding the Renaissance, and linear perspective in art. Film content will be included on midterm and final exams so students should take note and give their full attention to viewing, recording and memorizing facts.
A 10 points grade will be given for thorough completion of the worksheet. Worksheet is available as a file attachment below for students to view and print in the event that they were absent from class on the day of the film.
Famous Renaissance Paintings w/diagrams showing Linear Perspective Concepts

"School of Athens" by Raphael

"Tribute Money" by Masaccio

"Holy Trinity" by Masaccio
In this assignment students will begin to add more concepts to their visual "toolbox" in relation to building the Illusion of Space. We will now focus in on the ideas and practices of showing Proportion, Placement, & Perspective in our drawings. We will also discuss the concept of Atmospherice Perspective. These concepts will be added to the ideas of Foreground, Middle Ground and Back Ground, with Overlapping, as learned in the previous Photomontage assignments just completed. It is important that students succeed in grasping these concepts since they will be the foundation of all assignments to follow for the entire year in Beginning Art.
Sketch Assignment #1: On the first day, we will begin the Lesson with a Powerpoint and discussion on Proportion, Placement, Perspective & Atmospherice Perspective. Students will record the definitions in their sketchbooks and as a homework assignment they are required to find example images of each "space" art-concept on Google images or tape them into their sketchbooks with the definitions below. These images need not be bigger than a few inches square and students should be able to fit 2 per page of their sketch books. This sketch assignment should be completed by Thursday 8/15 and is worth 25 points at grade Check-in.
Sketch Assignment #2: Students will execute a planning sketch in their sketchbooks for the Big Drawing Assignment which is to follow. They will select one organic shaped object which will be repeated in their picture plane (drawing paper) showing Proportion, Placement, Perspective & Atmospherice Perspective. They will also use the concepts of Foreground, Middle Ground and Back Ground with Overlapping in this Drawing. This planning sketch assignment should be completed by Friday 8/15 and is worth 25 points.
- Once completed sketch assignments are completed, then students will move onto the Big Drawing and a larger 18" x 12" sheet of classroom drawing paper.
The Big Drawing: This drawing will be a larger scale version of students' planning sketches. Here are the criteria of what the drawing must show:
- The entire piece of paper must be completely filled with the objects which you choose to draw in repetition.
- You should organize your composition with some of your objects going off the sides of the picture plane even.
- Your drawing will consist of lines only & no shading of objects. You can use a variety of linear details to enhance the shapes and thickness of line to give dimension and interest to the subject matter which you are repeating in your overlapping design.
- Your drawing will have a strong use of both black and white space in composition.
- You will use an "organic" object of your own choosing and can research images on your phone or bring one in from home. Organic objects will be available in the classroom for you to use, including: sunflowers, apples, gourdes, peppers, squash, etc.
The Big Drawing will first be lightly sketched in pencil and then students will go over their lines with sharpie marker showing good attention to detail. This Assignment is worth 100 points and is considered a major assignment which holds 60% weight of their grade as described in our classroom syllabus.
Students will be graded on:
- Good understanding and execution of Proportion, Placement, Perspective, Atmosheric Perspective, Foreground, Middle Ground, Back Ground, Overlapping in their drawings.
- Good use of the entire paper or picture plane with objects going off the page.
- Neatness in their work and good use of material.

Parent Student Contract / Syllabus will be handed out the first week of classes. This document will need to be reviewed and signed by both the student and their parent or guardian. Please return by August 9th for 10 points.

Students- You will need colorful magazine photos as resources for this assignment. If possible, bring in items that align with your likes, interests or project themes which we discussed during the Montage Powerpoint presentation. We will be cutting the magazines up so don't bring anything that you wish to save or preserve. Students may earn 1 extra-credit point for each magazine brought in for themselves to use, or to share with others (maximum 20 points).
Assignment:
Students will be working on a Photomontage for their first project. The Montage is a cohesive scene that is comprised of found photo images which are cut from magazines and other printed references.
During class time on Friday, August 2nd, students will watch and discuss a powerpoint presentation which covers the following content and objectives of the assignment:
-
space - students will be able to build the illusion of 3-D space on their 2-D picture plane (which is a manilla file folder, in this case) thru established areas of foreground, middle ground, and background, with overlapping of objects/areas as designed in their projects.
-
processes- students will be able to cut out their montage images with exacto knives, and learn to paste with rubber cement - with mastery of best practices and good use of materials for neatness in their art pieces.
-
conceptual themes and narratives - students will be able to conceptulize and creatively formulate a "visual narrative or theme" in their artwork - as selected from a variety of themes discussed during class. Many of these themes were formulated by student creativity and "brainstorming". Students viewed several examples of Photomontage artworks with strong internal and culteral themes by artists Jerry Uelsman and Romare Bearden. They also looked over student work samples to help model project guidelines and enhance their own understanding.
Photomontage Themes students may choose from are:
-
Dream Landscapes
-
The Verde River
-
Conspiracy Theories (Aliens, Illuminati, Area 51, 9/11, etc.)
-
The Future /Time Travel
-
The Past / Time Travel
-
Issues of our Times - Political / Social / Economic / Environmental (examples: Gun Control, Border Issues, Global Warming, etc.
-
Summer Time ( or depiction of your Favorite Season).
If students come up with an alternate theme for their projects, they may discuss them with the teacher for approval. All themes and content must be school appropriate.
The Photomontage project is worth 100 points and is due at the beginning of class on August 12. If students do not complete projects by the due date, they will still be accepted, but student may loose points for late turn-in.
There will be a 50% for 50 point "Check-in" Progress grade assessed on August 8th. Students must show good progress to attain the full 50 points for reaching 50% completion. 50% will be judged by students having cut out and designed most all of their composition, and are near the glueing stage of the project. If they have accomplished less than this guideline they will be assessed points for what has been done, for example 25 points for 25% done.
Here is one student sample from a previous year. Also, check out the Beginning Art Gallery tab in the menu for more student photomontage samples!
.jpg)

Sketchbooks and Art Supplies are required by the end of the 1ST full week of classes. A printed supply list will be given out in the first days of school. You will be using your supplies when working on your homework and sketchbook assignments outside of class. When in class, you may use the school's art supplies provided. Please do not take classroom supplies home.
See a printable PDF file of Beginning Art Supply List attached here or below for your convenience.